
 面试官:怎么优雅的接口防刷处理方案
为了防止恶意访问接口造成服务器和数据库压力增大导致瘫痪,接口防刷在工作中是必不可少的。给大家介绍几种设计方案。
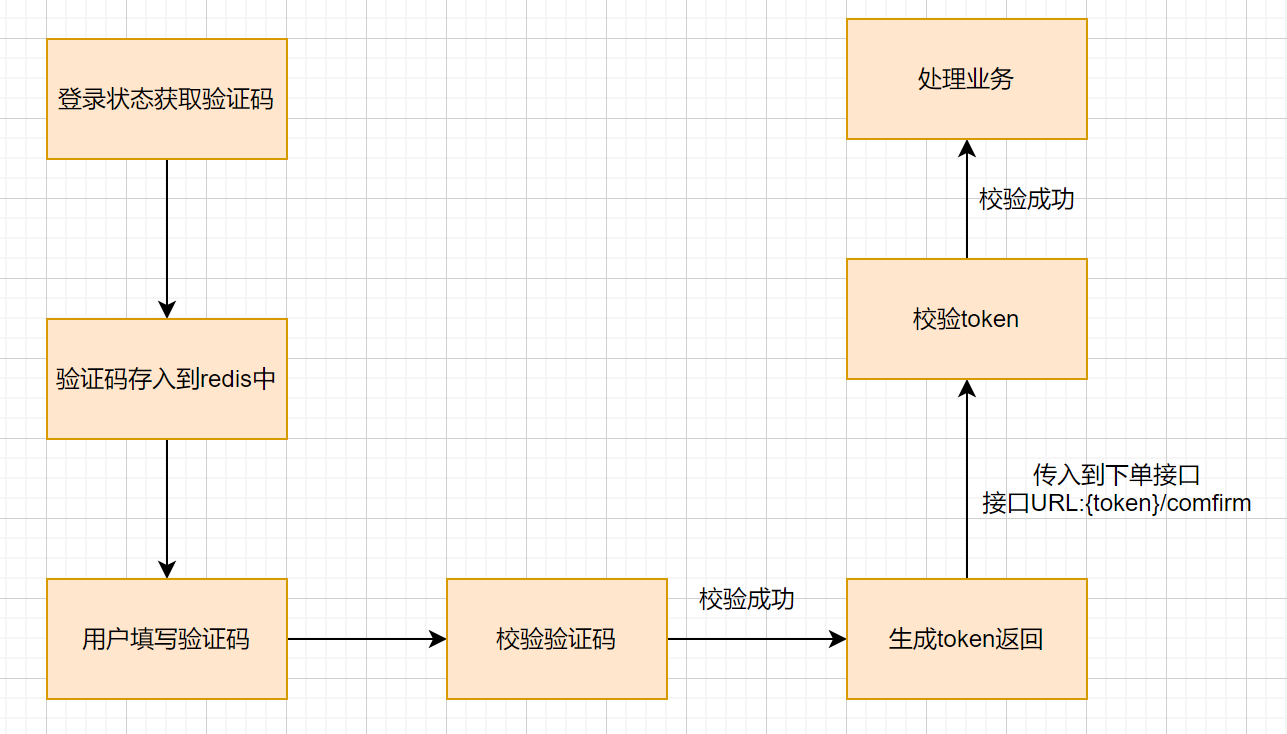
# 验证码
在登录状态下获取验证码,把验证码把保存在Redis(key是用户ID_商品ID)中,在提交的时候校验用户填写的验证码和Redis中验证码是否一样。
# token
Token 机制,Token 一般都是用来做鉴权的。对于有先后顺序的接口调用,我们要求进入下个接口之前,要在上个接口获得令牌, 不然就认定为非法请求。
验证码和token结合:
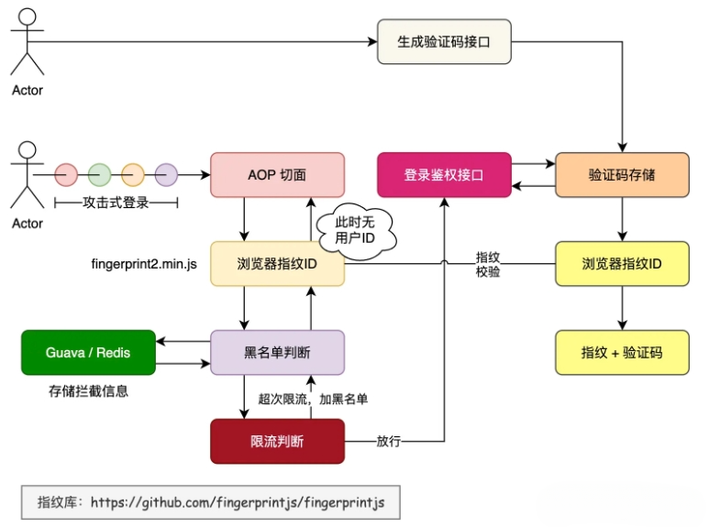
# 指纹ID
比如对于验证码接口虑添加一个指纹ID,对于验证码的生成与用户从浏览器设备过来的指纹做绑定。这样即使对方通过录屏拿到你的验证码,也仍然没有做登录操作。
<script>
  // Initialize the agent at application startup.
  const fpPromise = import('https://openfpcdn.io/fingerprintjs/v4')
    .then(FingerprintJS => FingerprintJS.load())

  // Get the visitor identifier when you need it.
  fpPromise
    .then(fp => fp.get())
    .then(result => {
      // This is the visitor identifier:
      const visitorId = result.visitorId
      console.log(visitorId)
    })
</script>
2
3
4
5
6
7
8
9
10
11
12
13
14
15
# 拦截器+Redis
通过ip地址+uri拼接作为z访问标识,在Interceptor中拦截请求,从Redis中统计用户访问接口次数从而达到接口防刷目的。
@Slf4j
public class BrowseLimitInterceptor implements HandlerInterceptor {

    @Autowired
    private RedisTemplate<String, Object> redisTemplate;


    //多长时间内
    @Value("${browse.second}")
    private Long second = 10L;

    //访问次数
    @Value("${browse.count}")
    private Long count = 3L;

    //禁用时长--单位/秒
    @Value("${browse.lockTime}")
    private Long lockTime = 60L;


    //锁住时的key前缀
    public static final String LOCK_PREFIX = "LOCK";

    //统计次数时的key前缀
    public static final String COUNT_PREFIX = "COUNT";

    @Override
    public boolean preHandle(HttpServletRequest request, HttpServletResponse response, Object handler) throws Exception {

        String uri = request.getRequestURI();
        String ip = request.getRemoteAddr();
        String lockKey = LOCK_PREFIX + ip + uri;
        Object isLock = redisTemplate.opsForValue().get(lockKey);
        if(Objects.isNull(isLock)){
            // 还未被禁用
            String countKey = COUNT_PREFIX + ip + uri;
            Object browseCount = redisTemplate.opsForValue().get(countKey);
            if(Objects.isNull(browseCount)){
                // 首次访问
                redisTemplate.opsForValue().set(countKey,1,second, TimeUnit.SECONDS);
            }else{
                // 没到限制访问次数
                if((Integer)browseCount < count){
                    redisTemplate.opsForValue().increment(countKey);
                }else{
                    log.info("{}禁用访问{}",ip, uri);
                    // 禁用
                    redisTemplate.opsForValue().set(lockKey, 1,lockTime, TimeUnit.SECONDS);
                    throw new CommonException(ResultCode.ACCESS_FREQUENT);
                }
            }
        }else{
            // 此用户访问此接口已被禁用
            throw new CommonException(ResultCode.ACCESS_FREQUENT);
        }
        return true;

    }
}
2
3
4
5
6
7
8
9
10
11
12
13
14
15
16
17
18
19
20
21
22
23
24
25
26
27
28
29
30
31
32
33
34
35
36
37
38
39
40
41
42
43
44
45
46
47
48
49
50
51
52
53
54
55
56
57
58
59
流程图如下:
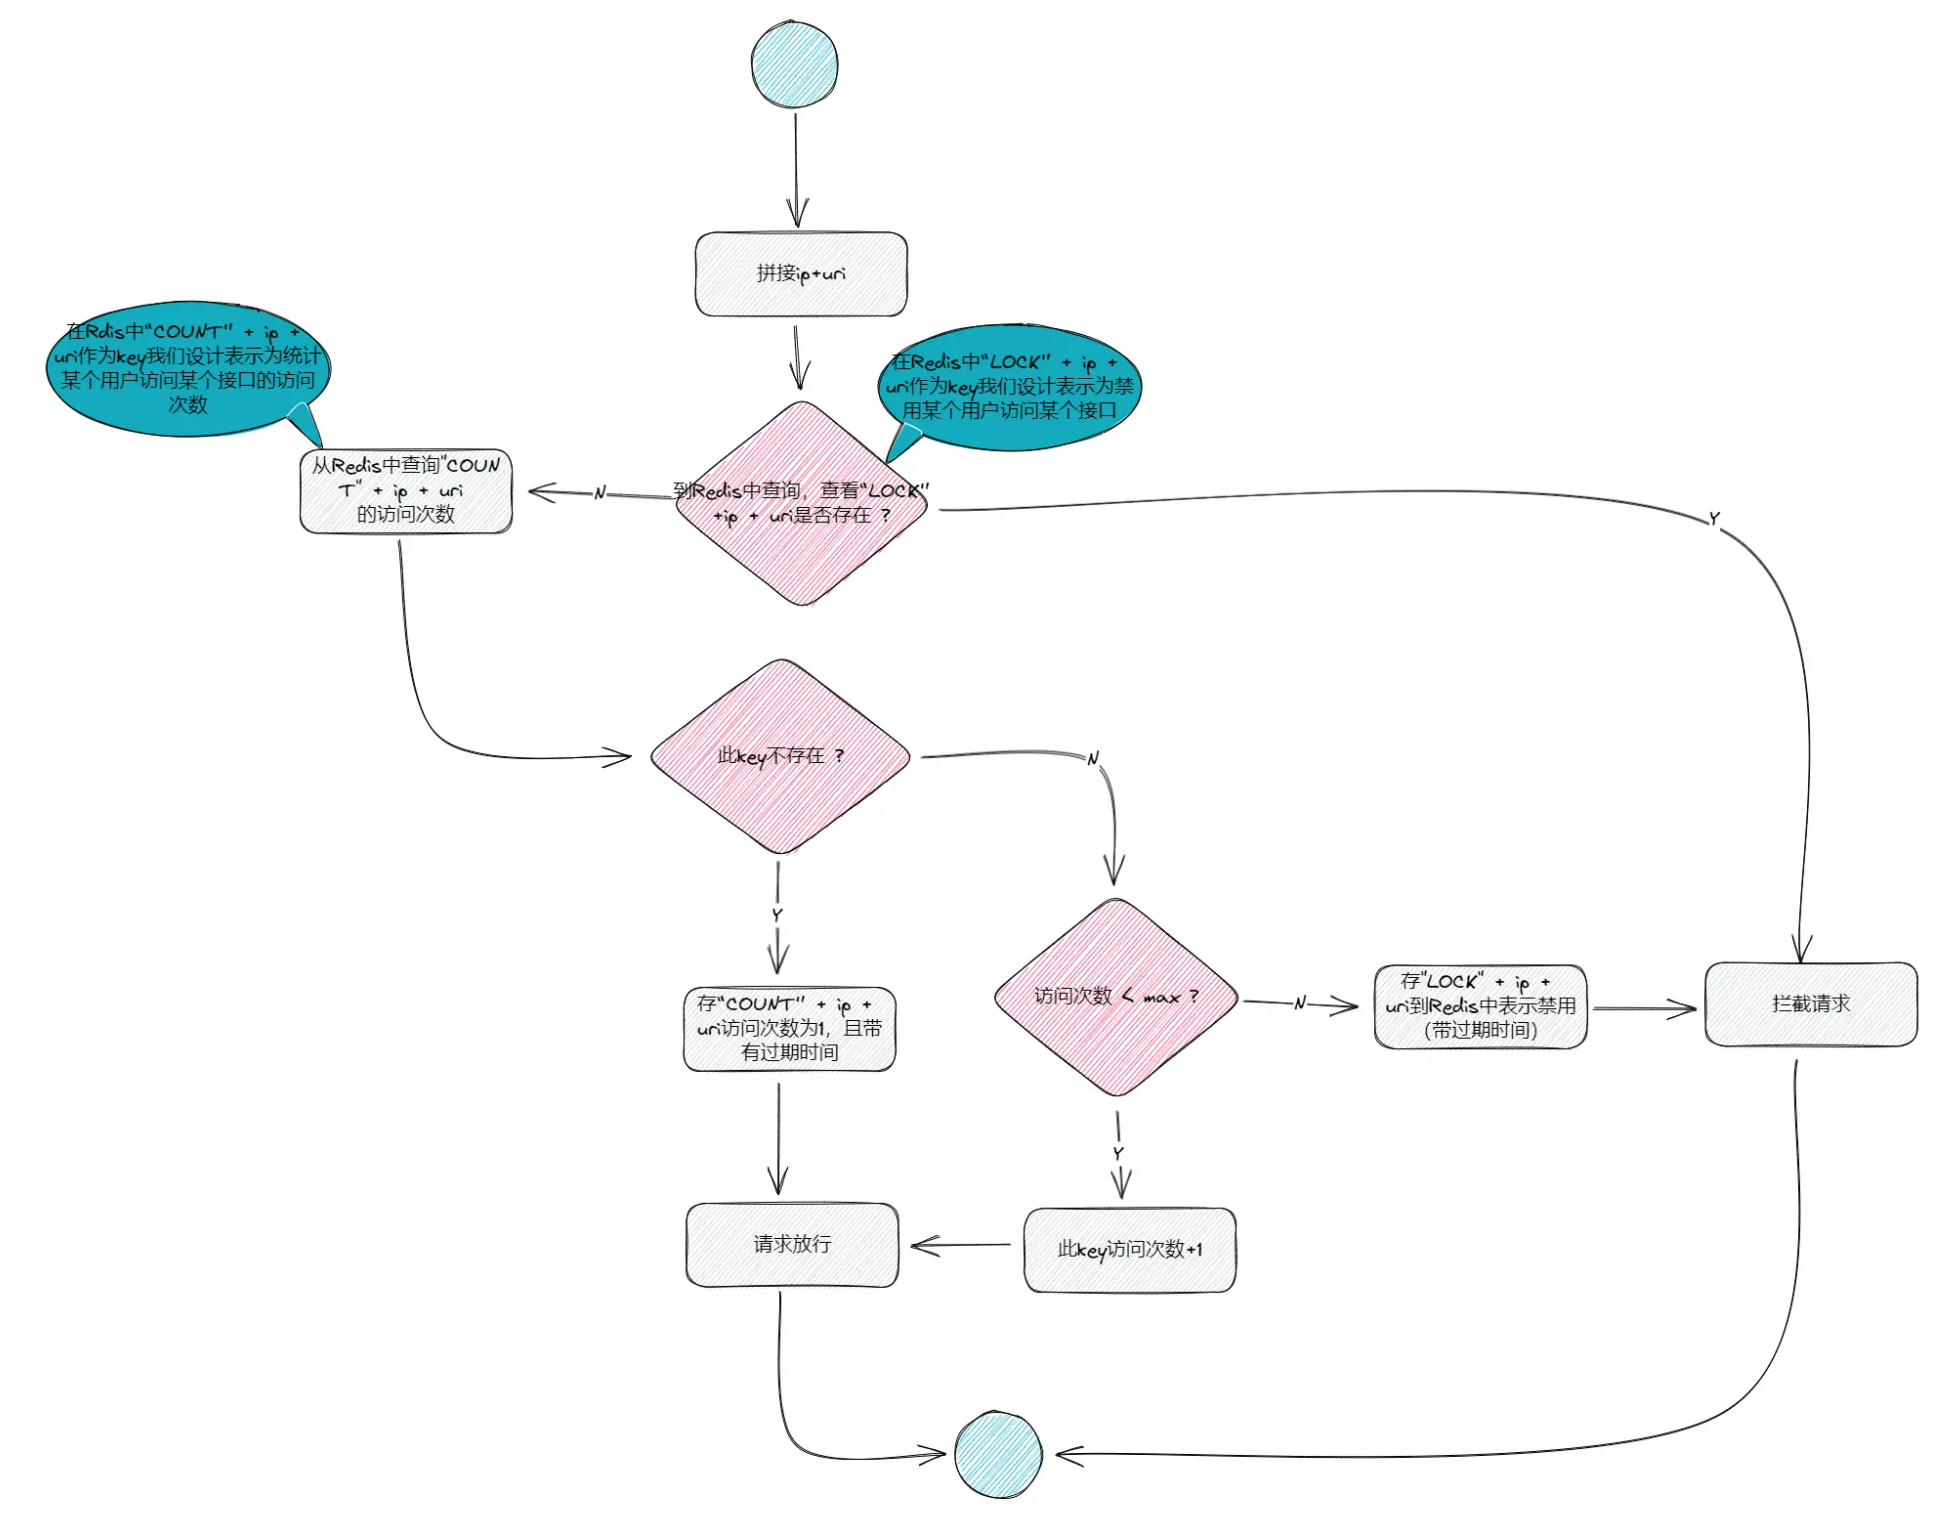
这种方案最大的弊病是统一设置接口的访问防刷规则是x 秒内 y 次访问次数,禁用时长为 a 秒,在实际应用中可能每个接口的规则是不同的。
# 注解+拦截器
自定义注解
@Retention(RUNTIME)
@Target({METHOD, TYPE})
public @interface BrowserLimit {

    /**
     * 秒
     * @return 多少秒内
     */
    long second() default 5L;

    /**
     * 最大访问次数
     * @return 最大访问次数
     */
    long maxCount() default 3L;

    /**
     * 禁用时长,单位/秒
     * @return 禁用时长
     */
    long forbiddenTime() default 120L;
}
2
3
4
5
6
7
8
9
10
11
12
13
14
15
16
17
18
19
20
21
22
23
定义拦截器
@Slf4j
public class AccessLimintInterceptor implements HandlerInterceptor {
    @Autowired
    private RedisTemplate<String, Object> redisTemplate;


    /**
     * 锁住时的key前缀
     */
    public static final String LOCK_PREFIX = "LOCK";

    /**
     * 统计次数时的key前缀
     */
    public static final String COUNT_PREFIX = "COUNT";


    @Override
    public boolean preHandle(HttpServletRequest request, HttpServletResponse response, Object handler) throws Exception {

        if (handler instanceof HandlerMethod) {

            HandlerMethod targetMethod = (HandlerMethod) handler;
            // 获取目标接口方法所在类的注解@BrowserLimit
            BrowserLimit targetClassAnnotation = targetMethod.getMethod().getDeclaringClass().getAnnotation(BrowserLimit.class);

            // 标记此类是否加了@BrowserLimit注解
            boolean isBrushForAllInterface = false;
            String ip = request.getRemoteAddr();
            String uri = request.getRequestURI();
            long second = 0L;
            long mostCount = 0L;
            long forbiddenTime = 0L;
            if (!Objects.isNull(targetClassAnnotation)) {

                isBrushForAllInterface = true;
                second = targetClassAnnotation.second();
                mostCount = targetClassAnnotation.maxCount();
                forbiddenTime = targetClassAnnotation.forbiddenTime();
            }
            // 目标方法中的 BrowserLimit注解
            BrowserLimit accessLimit = targetMethod.getMethodAnnotation(BrowserLimit.class);
            // 判断此方法接口是否要进行防刷处理
            if (!Objects.isNull(accessLimit)) {

                second = accessLimit.second();
                mostCount = accessLimit.maxCount();
                forbiddenTime = accessLimit.forbiddenTime();
                if (isForbindden(second, mostCount, forbiddenTime, ip, uri)) {
                    throw new CommonException(ResultCode.ACCESS_FREQUENT);
                }
            } else {
                // 判断类上是否加了防刷注解
                if (isBrushForAllInterface && isForbindden(second, mostCount, forbiddenTime, ip, uri)) {
                    throw new CommonException(ResultCode.ACCESS_FREQUENT);
                }
            }
        }
        return true;
    }

    /**
     * 判断某用户访问某接口是否已经被禁用/是否需要禁用
     *
     * @param second        多长时间  单位/秒
     * @param maxCount      最大访问次数
     * @param forbiddenTime 禁用时长 单位/秒
     * @param ip            访问者ip地址
     * @param uri           访问的uri
     * @return ture为需要禁用
     */
    private boolean isForbindden(long second, long maxCount, long forbiddenTime, String ip, String uri) {
        String lockKey = LOCK_PREFIX + ip + uri; //如果此ip访问此uri被禁用时的存在Redis中的 key
        Object isLock = redisTemplate.opsForValue().get(lockKey);
        // 判断此ip用户访问此接口是否已经被禁用
        if (Objects.isNull(isLock)) {
            // 还未被禁用
            String countKey = COUNT_PREFIX + ip + uri;
            Object count = redisTemplate.opsForValue().get(countKey);
            if (Objects.isNull(count)) {
                // 首次访问
                redisTemplate.opsForValue().set(countKey, 1, second, TimeUnit.SECONDS);
            } else {
                // 此用户前一点时间就访问过该接口,且频率没超过设置
                if ((Integer) count < maxCount) {
                    redisTemplate.opsForValue().increment(countKey);
                } else {
                    log.info("{}禁用访问{}", ip, uri);
                    // 禁用
                    redisTemplate.opsForValue().set(lockKey, 1, forbiddenTime, TimeUnit.SECONDS);
                    return true;
                }
            }
        } else {
            // 此用户访问此接口已被禁用
            return true;
        }
        return false;
    }
}
2
3
4
5
6
7
8
9
10
11
12
13
14
15
16
17
18
19
20
21
22
23
24
25
26
27
28
29
30
31
32
33
34
35
36
37
38
39
40
41
42
43
44
45
46
47
48
49
50
51
52
53
54
55
56
57
58
59
60
61
62
63
64
65
66
67
68
69
70
71
72
73
74
75
76
77
78
79
80
81
82
83
84
85
86
87
88
89
90
91
92
93
94
95
96
97
98
99
100
这种方案有一个问题,就是接口请求路径中带有参数,例如:“/get/{id}",参数值不同,防刷就失效了。
可以用全类名+方法名作为key
String className = targetMethod.getMethod().getDeclaringClass().getName();

String methodName = targetMethod.getMethod().getName();
2
3
在接口上添加注解
    @GetMapping("/get/{id}")
    @BrowserLimit(second = 3, maxCount = 2, forbiddenTime = 40L)
    public Result getOne(@PathVariable("id") Integer id){
        log.info("执行[pass]-getOne()方法,id为{}", id);
        return Result.SUCCESS();
    }
2
3
4
5
6
7
# Nginx限流
安装ab测试
#ab运行需要依赖apr-util包,安装命令为:
yum install apr-util
#安装依赖 yum-utils中的yumdownload 工具,如果没有找到 yumdownload 命令可以
yum install yum-utils
cd /opt
mkdir abtmp
cd abtmp
yum install yum-utils.noarch
yumdownloader httpd-tools*
rpm2cpio httpd-*.rpm | cpio -idmv
cd /opt/abtmp/usr/bin
./ab -c 100 -n 10000 http://127.0.0.1/post #-c 100 即:每次并发100个 -n 10000 即: 共发送10000个请求
2
3
4
5
6
7
8
9
10
11
12
# ngx_http_limit_conn_module
# limit_conn_zone
ngx_http_limit_conn_module 可以对于一些服务器流量异常、负载过大,甚至是大流量的恶意攻击访问等,进行并发数的限制;该模块可以根据定义的键来限制每个键值的连接数,只有那些正在被处理的请求(这些请求的头信息已被完全读入)所在的连接才会被计数。
limit_conn_zone $binary_remote_addr zone=addr:10m;
limit_conn_zone只能够在http块中使用limit_conn_zone:用来配置限流key及存放key对应信息的共享内存区域大小。此处的key是“$binary_remote_addr”,表示IP地址,也可以使用$server_name作为key来限制域名级别的最大连接数。
limit_conn_status:配置被限流后返回的状态码,默认返回503。 ·limit_conn_log_level:配置记录被限流后的日志级别,默认error级别。
客户端的IP地址作为键。
binary_remote_addr变量的长度是固定的4字节,存储状态在32位平台中占用32字节或64字节,在64位平台中占用64字节。
1M共享空间可以保存3.2万个32位的状态,1.6万个64位的状态。如果共享内存空间被耗尽,服务器将会对后续所有的请求返回 503 (Service Temporarily Unavailable) 错误。
# limit_conn
 server {
     location /get/ {
         # 指定每个给定键值的最大同时连接数,同一IP同一时间只允许有1个连接
         limit_conn addr 1;
     }
 }
2
3
4
5
6
limit_conn:要配置存放key和计数器的共享内存区域和指定key的最大连接数。此处指定的最大连接数是1,表示Nginx最多同时并发处理1个连接。
# ngx_http_limit_req_module
limit_req是漏桶算法实现,用于对指定key对应的请求进行限流。可以限制来自单个IP地址的请求处理频率。 限制的方法如同漏斗,每秒固定处理请求数,推迟过多请求。
# 限制请求数,大小为10m, 平均处理的频率不能超过每秒1次
limit_req_zone $binary_remote_addr zone=one:10m rate=1r/s;

server {

location /xxx/ {
	# 桶容量5,默认会被延迟处理,如果不希望延迟处理,可以使用nodelay参数
	limit_req zone=one burst=5 nodelay;
}
2
3
4
5
6
7
8
9
- limit_req_zone:配置限流key、存放key对应信息的共享内存区域大小、固定请求速率。此处指定的key是“$binary_remote_addr”,表示IP地址。固定请求速率使用rate参数配置,支持10r/s和60r/m,即每秒10个请求和每分钟60个请求。不过,最终都会转换为每秒的固定请求速率(10r/s为每100毫秒处理一个请求,60r/m为每1000毫秒处理一个请求)。
- limit_req:配置限流区域、桶容量(突发容量,默认为0)、是否延迟模式(默认延迟)。
# lua-resty-limit-traffic
上面介绍的两个模块使用简单,对于复杂的场景很难实现,OpenResty提供了Lua限流模块lua-resty-limit-traffic,通过它可以按照更复杂的业务逻辑进行动态限流处理。
CentOS系统中安装openresty
sudo yum install yum-utils
sudo yum-config-manager --add-repo https://openresty.org/package/centos/openresty.repo
sudo yum install openresty
2
3
openresty安装后默认目录在/usr/local/openresty/,nginx目录在/usr/local/openresty/nginx/
定义lua脚本access_by_lua_block.lua
local limit_conn = require "resty.limit.conn"
local limit_req = require "resty.limit.req"
local limit_traffic = require "resty.limit.traffic"
 # 300:固定平均速率 300r/s 200:桶容量
local lim1, err = limit_req.new("my_req_store", 300, 200)
assert(lim1, err)
local lim2, err = limit_req.new("my_req_store", 200, 100)
assert(lim2, err)
local lim3, err = limit_conn.new("my_conn_store", 1000, 1000, 0.5)
assert(lim3, err)

local limiters = {lim1, lim2, lim3}

local host = ngx.var.host
local client = ngx.var.binary_remote_addr
local keys = {host, client, client}

local states = {}
# 聚合限流器
local delay, err = limit_traffic.combine(limiters, keys, states)
if not delay then
    if err == "rejected" then
        return ngx.exit(503)
    end
    ngx.log(ngx.ERR, "failed to limit traffic: ", err)
    return ngx.exit(500)
end

if lim3:is_committed() then
    local ctx = ngx.ctx
    ctx.limit_conn = lim3
    ctx.limit_conn_key = keys[3]
end

print("sleeping ", delay, " sec, states: ",
    table.concat(states, ", "))

if delay >= 0.001 then
    ngx.sleep(delay)
end
2
3
4
5
6
7
8
9
10
11
12
13
14
15
16
17
18
19
20
21
22
23
24
25
26
27
28
29
30
31
32
33
34
35
36
37
38
39
40
在 nginx.conf 的 server模块引入lua脚本:
   server{

        listen 8080;
        server_name  _;
        access_by_lua_file "/usr/local/openresty/nginx/lua/access_by_lua_block.lua";
        location /{
           proxy_pass  http://127.0.0.1:8083;
        }

   }
2
3
4
5
6
7
8
9
10
11
# OpenResty + Lua + Redis 实现 IP 限流
在/usr/local/openresty/nginx/lua目录下新建脚本access_by_redis.lua
local function close_redis(red)
    if not red then
        return
    end
    -- 释放连接(连接池实现),毫秒
    local pool_max_idle_time = 10000
    -- 连接池大小
    local pool_size = 100
    local ok, err = red:set_keepalive(pool_max_idle_time, pool_size)
    local log = ngx_log
    if not ok then
        log(ngx_ERR, "set redis keepalive error : ", err)
    end
end

-- 连接redis
local redis = require('resty.redis')
local red = redis.new()
red:set_timeout(1000)

local ip = "127.0.0.1"
local port = "6379"
local ok, err = red:connect(ip,port)
if not ok then
    return close_redis(red)
end
#red:auth('123456')
red:select('0')

local clientIP = ngx.req.get_headers()["X-Real-IP"]
if clientIP == nil then
   clientIP = ngx.req.get_headers()["x_forwarded_for"]
end
if clientIP == nil then
   clientIP = ngx.var.remote_addr
end

local incrKey = "user:"..clientIP..":freq"
local blockKey = "user:"..clientIP..":block"

local is_block,err = red:get(blockKey) -- check if ip is blocked
if tonumber(is_block) == 1 then
    ngx.exit(403)
    close_redis(red)
end

local inc  = red:incr(incrKey)

if inc < 10 then
   inc = red:expire(incrKey,1)
end
-- 每秒10次以上访问即视为非法,会阻止1分钟的访问
if inc > 10 then
    --设置block 为 True 为1
    red:set(blockKey,1)
    red:expire(blockKey,60)
end

close_redis(red)
2
3
4
5
6
7
8
9
10
11
12
13
14
15
16
17
18
19
20
21
22
23
24
25
26
27
28
29
30
31
32
33
34
35
36
37
38
39
40
41
42
43
44
45
46
47
48
49
50
51
52
53
54
55
56
57
58
59
修改/usr/local/openresty/nginx/conf目录下nginx.conf
server{

    listen 8080;
    server_name  _;
    access_by_lua_file "/usr/local/openresty/nginx/lua/access_by_redis.lua";
    location /{
        proxy_pass  http://127.0.0.1:8083;
    }

}
2
3
4
5
6
7
8
9
10
# OpenResty + Lua + Redis 实现防刷
-- access_by_lua_file '/opt/ops/lua/access_limit.lua'
local function close_redis(red)
    if not red then
        return
    end
    --释放连接(连接池实现)
    local pool_max_idle_time = 10000 --毫秒
    local pool_size = 100 --连接池大小
    local ok, err = red:set_keepalive(pool_max_idle_time, pool_size)

    if not ok then
        ngx_log(ngx_ERR, "set redis keepalive error : ", err)
    end
end

local redis = require "resty.redis"
local red = redis:new()
red:set_timeout(1000)
local ip = "redis-ip"
local port = redis-port
local ok, err = red:connect(ip,port)
if not ok then
    return close_redis(red)
end

local clientIP = ngx.req.get_headers()["X-Real-IP"]
if clientIP == nil then
   clientIP = ngx.req.get_headers()["x_forwarded_for"]
end
if clientIP == nil then
   clientIP = ngx.var.remote_addr
end

local incrKey = "user:"..clientIP..":freq"
local blockKey = "user:"..clientIP..":block"

local is_block,err = red:get(blockKey) -- check if ip is blocked
if tonumber(is_block) == 1 then
   ngx.exit(ngx.HTTP_FORBIDDEN)
   return close_redis(red)
end

local res, err = red:incr(incrKey)

if res == 1 then
   res, err = red:expire(incrKey,1)
end

if res > 200 then
    res, err = red:set(blockKey,1)
    res, err = red:expire(blockKey,600)
end

close_redis(red)
2
3
4
5
6
7
8
9
10
11
12
13
14
15
16
17
18
19
20
21
22
23
24
25
26
27
28
29
30
31
32
33
34
35
36
37
38
39
40
41
42
43
44
45
46
47
48
49
50
51
52
53
54
- 01
- 保姆级教程 用DeepSeek+飞书,批量写文案、写文章,太高效了06-06
- 03
- 熬夜做PPT?AI一键生成高逼格幻灯片,效率提升10倍!06-06